
Android WebView App is an Android application that allows developers to display web content within the app, without requiring users to switch to a separate browser. It is a built-in system component that developers can customize to meet their specific needs, and is commonly used for news readers, social media clients, and other applications that rely on web content. However, developers should be mindful of the security implications when using WebView.
What you needed to create or modify the App
- Download and install Android Studio: You can download the latest version of Android Studio from the official website, and follow the installation instructions.
- Create a new project: Once you have installed Android Studio, open it and click on “Start a new Android Studio project”. You will be prompted to choose a project template, select the “Empty Activity” template and give your project a name.
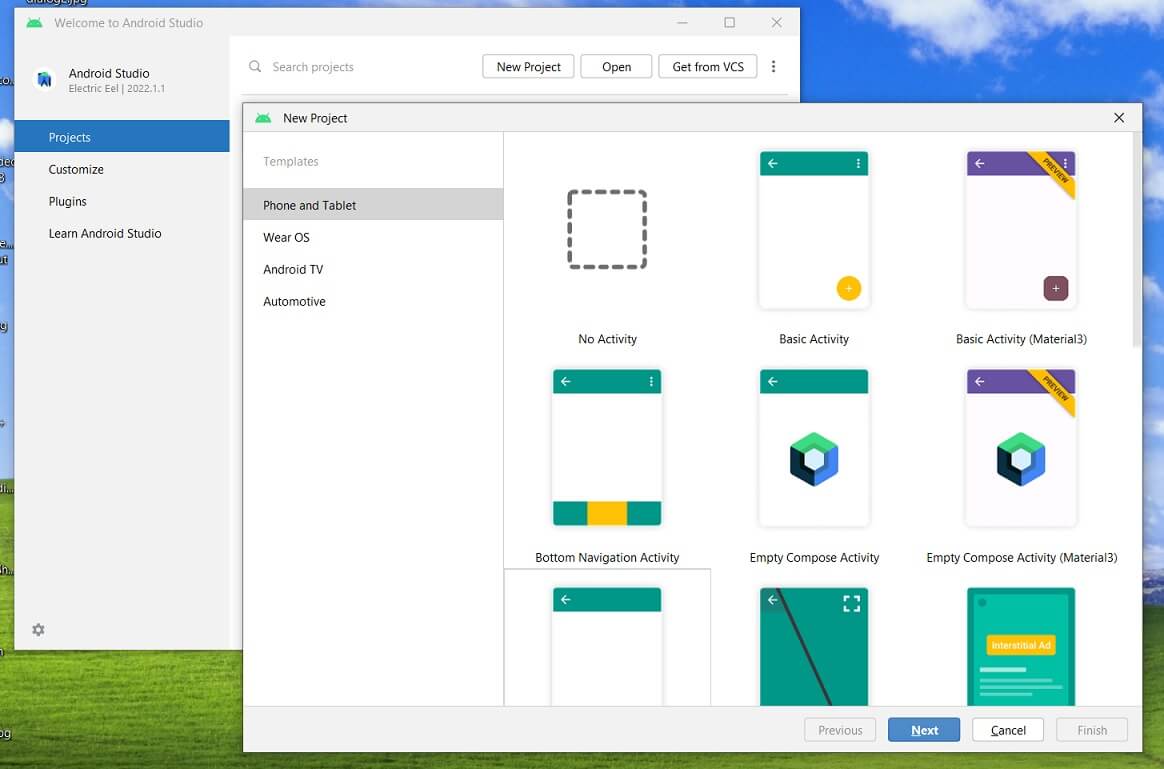
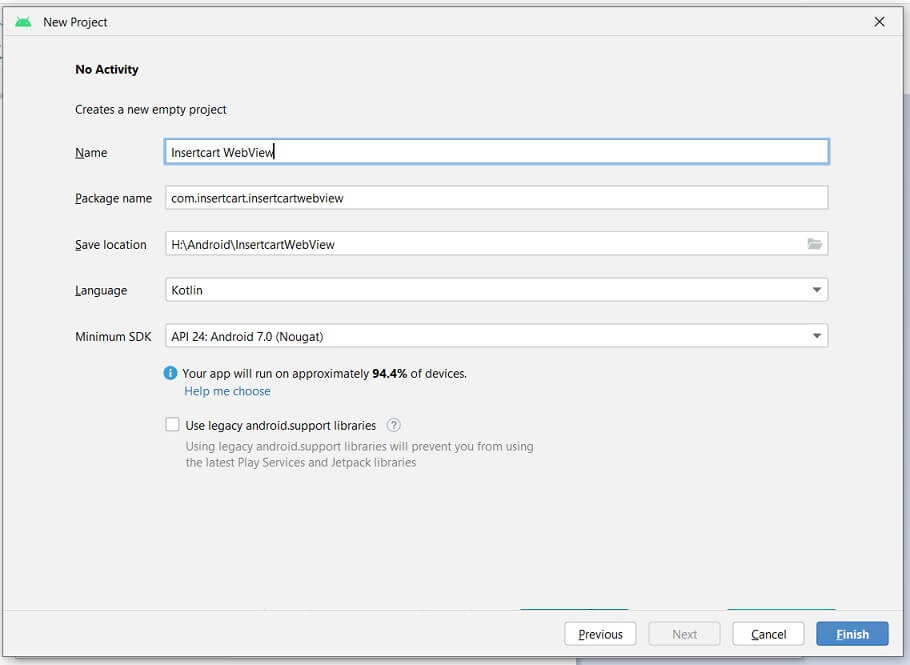
- Set up your project: You will be presented with a dialog box that allows you to configure your project Name the App . Here, you can choose the Android SDK version, the minimum SDK(Minimum support android version for your app) version required for your app, and the language you want to use. Once you’ve made your selections, click on “Finish“.
- Wait for a few moments so android can download libraries (internet is required).
Introduction to Android Studio
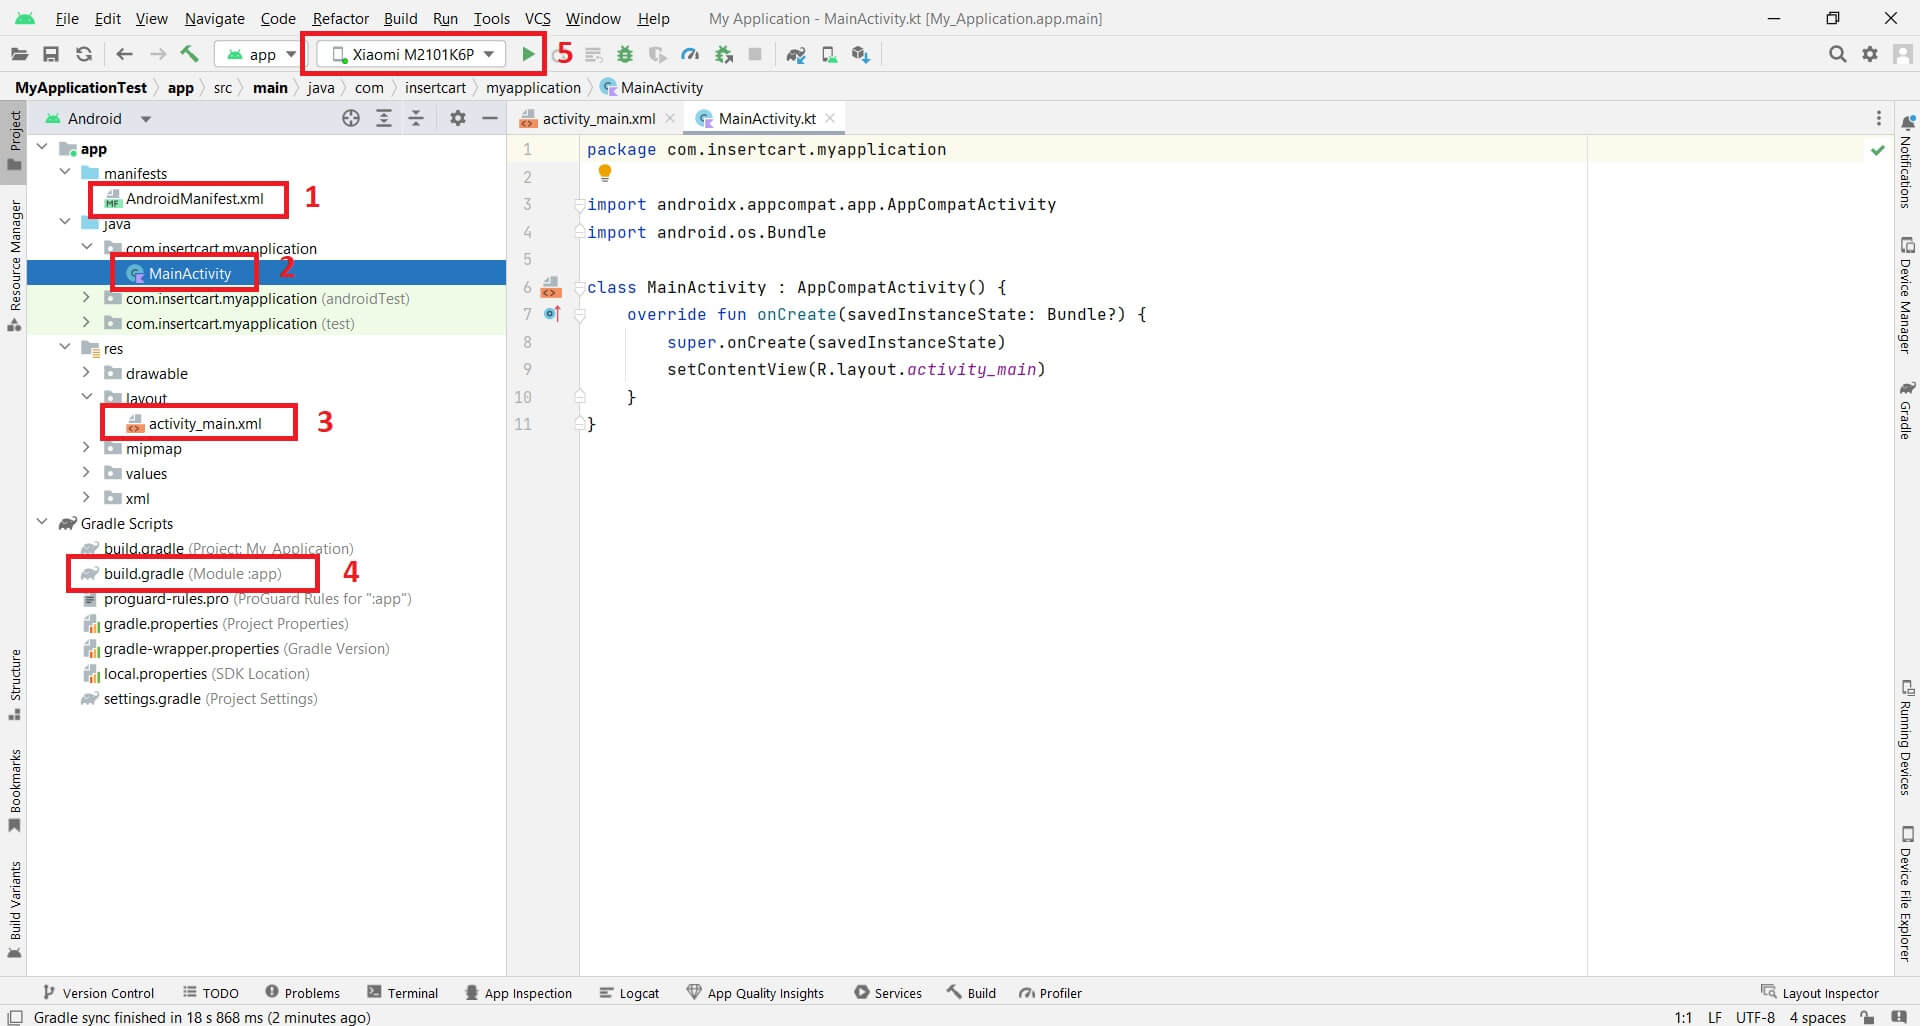
1. AndroidManifest.xml
The AndroidManifest.xml file is an important configuration file in an Android app project. Its main purpose is to provide essential information about the app to the Android operating system, such as:
- Package name
- Permissions
- Activities, services, and receivers
- Intent filters
- App metadata
2. MainActivity file
This entry point of the app, and its main purpose is to provide the user interface (UI) for the first screen that the user sees when they launch the app.
3. Activity_Main.XML
Mostly XML file contain the design part of app in the layout folder. activity_main.xml contain a design screen for MainActivity.java or .kt file.
4. build.gradle file (Module: app)
Here are some of the key features and functionalities of the build.gradle file:
- Dependencies: The build.gradle file lists all the external libraries and modules that the app requires to run. It allows developers to specify the version of the libraries and manage their dependencies.
- Build types: The build.gradle file defines the different build types for the app, such as debug, release, or custom builds. It allows developers to specify different settings for each build type, such as debuggable mode or proguard configuration.
- Product flavors: The build.gradle file allows developers to create product flavors, which are variations of the app with different features or configurations. For example, a paid and free version of the app may have different product flavors.
- Version codes and names: The build.gradle file allows developers to specify the version codes and names for the app, which are used to identify and track the app’s versions.
- Signing configurations: The build.gradle file can also define the signing configurations for the app, which are used to sign the app’s APK file for release.
5. App Run Button on Android studio
When you attach your phone to android studio to test your app like we will test our insertcart app. Your phone will be shown in list (Of course after enabling developer options from the phone) and after completing the project you just need to hit run.
Android WebView App – Kotlin
package com.insertcart.myapplication

import android.os.Bundle
import android.view.LayoutInflater
import android.webkit.WebView
import androidx.appcompat.app.AppCompatActivity

class MainActivity : AppCompatActivity() {

    override fun onCreate(savedInstanceState: Bundle?) {
        super.onCreate(savedInstanceState)
      //  setContentView(R.layout.activity_main)

        // Inflate the layout file
        val layoutInflater = LayoutInflater.from(this)
        val view = layoutInflater.inflate(R.layout.activity_main, null)

        // Find the WebView element by ID
        val webView = view.findViewById<WebView>(R.id.webView)

        // Load a website
        webView.loadUrl("https://www.insertcart.com")

        // Set the layout file as the main content view
        setContentView(view)
    }
}
Java Code
package com.insertcart.myapplication;

import android.os.Bundle;
import android.view.LayoutInflater;
import android.webkit.WebView;
import androidx.appcompat.app.AppCompatActivity;

public class MainActivity extends AppCompatActivity {

    @Override
    protected void onCreate(Bundle savedInstanceState) {
        super.onCreate(savedInstanceState);

        // Inflate the layout file
        LayoutInflater layoutInflater = LayoutInflater.from(this);
        android.view.View view = layoutInflater.inflate(R.layout.activity_main, null);

        // Find the WebView element by ID
        WebView webView = view.findViewById(R.id.webView);

        // Load a website
        webView.loadUrl("https://www.insertcart.com");

        // Set the layout file as the main content view
        setContentView(view);
    }
}
Layout XML
<?xml version="1.0" encoding="utf-8"?>
<androidx.constraintlayout.widget.ConstraintLayout xmlns:android="http://schemas.android.com/apk/res/android"
    xmlns:app="http://schemas.android.com/apk/res-auto"
    xmlns:tools="http://schemas.android.com/tools"
    android:layout_width="match_parent"
    android:layout_height="match_parent"
    tools:context=".MainActivity">

    <WebView
        android:id="@+id/webView"
        android:layout_width="match_parent"
        android:layout_height="match_parent" />

</androidx.constraintlayout.widget.ConstraintLayout>
Add Permission to Use the Internet
<?xml version="1.0" encoding="utf-8"?>
<manifest xmlns:android="http://schemas.android.com/apk/res/android"
    xmlns:tools="http://schemas.android.com/tools">

    <uses-permission android:name="android.permission.INTERNET" />
You can also get Android App for your website from here
Use Coupon “onlycode” to get the code only for $10 with everything configured + Admob + Firebase + WordPress Special and many more


Leave a Reply