
When you try to downgrade your Linode (Akamai Compute Instance) plan, you may see a warning that your current disk is too large for the smaller plan. Even if you’re using only a small amount of space, the actual size of the disk matters. This guide explains, in a simple and practical way, how to safely shrink your disk, avoid data loss, and complete the resize.
Why This Error Appears
Every Linode plan includes a specific amount of disk space. If your disk is larger than what the new plan supports, the system prevents the resize. For example:
- Current disk size: 630 GB
- New plan limit: 320 GB
- Actual usage: 57 GB
Even though you have plenty of free space, the disk itself is still 630 GB. To switch to a smaller plan, you must first shrink the disk.
Is It Safe to Shrink a Disk?
Shrinking a disk is safe as long as you follow the correct order of steps:
- Check the filesystem for issues.
- Shrink the filesystem to a smaller size.
- Shrink the disk to match.
By shrinking only to a size larger than your actual data usage, you will not lose any data.
Step-by-Step Guide to Shrink Your Linode Disk
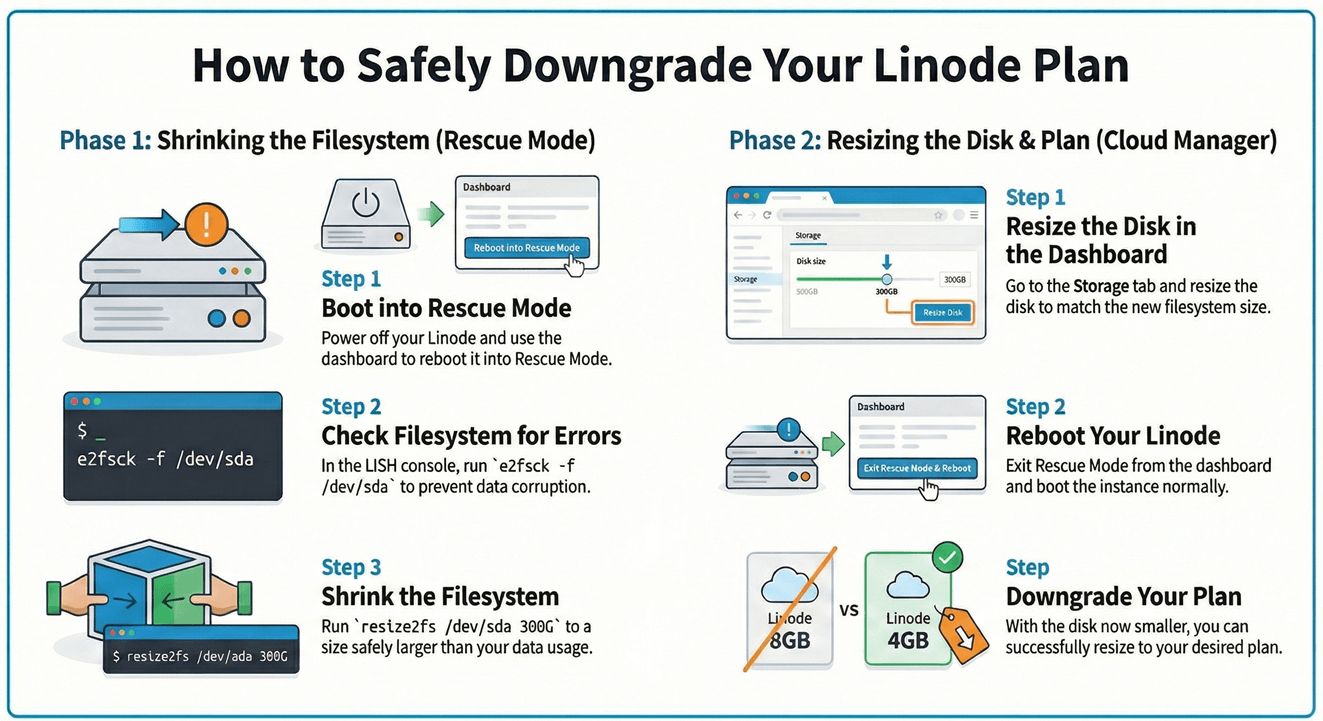
Step 1: Power Off Your Linode
You cannot shrink a disk while the system is running.
- In Cloud Manager, open your Linode and click Power Off.
Step 2: Boot Into Rescue Mode
Rescue Mode lets you safely work on your disks without affecting your main system.
- Go to Rescue in your Linode dashboard.
- Select your disk.
- Click Reboot into Rescue Mode.
Step 3: Launch the LISH Console
This gives you terminal access inside Rescue Mode.
- Click Launch LISH Console.
Step 4: Identify Your Disk
Run the following command:
fdisk -l
Find the main disk (usually /dev/sda).
Step 5: Check the Filesystem (Safe Command)
This step is important for preventing data corruption.
e2fsck -f /dev/sda
This command only scans and fixes filesystem issues. It does not delete, modify, or erase your data.
Step 6: Shrink the Filesystem
Make sure you shrink it to a size larger than what you’re using. For example, if you’re using 57 GB, shrinking to 300 GB is safe.
resize2fs /dev/sda 300G
Let the process complete. It may take several minutes.
Step 7: Shrink the Disk in Cloud Manager
Once the filesystem is smaller, you can adjust the disk size in the dashboard.
- Go to your Linode → Storage.
- Click Resize Disk.
- Enter 300 GB.
- Save.
Disk resizing usually completes quickly.
Step 8: Boot Normally
- Exit Rescue Mode.
- Click Boot to start your Linode normally.
Now the disk is small enough to fit the new plan.
Step 9: Resize the Linode Plan
Go to Resize and choose your smaller plan. The process should now work without warnings.
Tips for a Smooth Resize
- Always shrink the filesystem before shrinking the disk.
- Choose a safe size. It must be larger than the data you’re storing.
- Never interrupt
resize2fsduring operation. - Keep a snapshot or backup if possible.
Summary
Shrinking your Linode disk is straightforward when done in the right order. The commands you run in Rescue Mode only prepare the filesystem and ensure it’s clean before resizing. By shrinking the filesystem first, then the disk, you can safely downgrade your Linode plan without losing any data.
If you’re careful and follow each step properly, the entire process can be completed smoothly and safely.


Leave a Reply